"Why? Identifying A Motherboard"
Computer Facts & Questions Buletin Board (Answered: Why To Identify Your Motherboard):
I bought an AMD Athlon 2500 and ASUS motherboard a7nx or something . On my computer in system on control panel. It says my computer si 1.09ghz it's really a 2.4ghz how do I fix this? What's the safest speed to overclock my motherboard to and my GeForce ti 4400 to?
--------------------------------------------------------------------------------
Answer, October 14th, 2003, 04:38 PM
if your board did not come with a user manual, download it from the ASUS site, on the motherboard next to the ram slots there is a jumper that must be set to the speed of the cpu and ram, called a dram jumper, this is for dual, or even triple supportive boards, if you put a duron on the same board it's speeds would be different. the reason for this, if anyone remembers the first pc2100 boards (even ASUS) had a lot of problems, it was from trying to detect the speeds of different processor/ram setups.
******** Please find below the information on "How To Identify Your Computer's Motherboard, and Motherboard Bios, and Motherboard Series." The Motherboard and Bios Information will give you the information necessary to Google for the "Manufacturers Web Site", determine the Motherboard and Bios, whereby you may download the Motherboard's Manual, which will identify the "steps for you to take to set the motherboard's recognition of the processor "Motherboard Processor and Voltage", and thereby make sure your computer is running at the maximum proper speed, for and of which the processor was designed to operate.
"Identifying A Motherboard"
Every now and then, we see questions in the PC911 Forum regarding identification of the mainboard installed in a PC. Many users simply don't know the make and model of the mainboard (motherboard or mobo) that their systems are built around. Does this really matter? No ... not unless and until something goes wrong where you need that info to effect a repair. Or, until you decide to perform some DIY system upgrade and suddenly you need to know something specific about the board.
If all was done according to Hoyle when you purchased your system, you received some sort of documentation with it. Many times, that documentation will include at least a spec sheet itemizing the individual components, and at best it will include a User's Guide or manual for the mobo.
Several types of system upgrades might require the user to have this documentation. Sometimes, you will need to change jumper or DIP switch settings when installing a processor of a different type or speed. Some memory changes will also require such changes. Then there are such tasks as enabling or disabling integrated sound, modem, and video features. Or, maybe you're just plain curious! If you find yourself in the position of needing to identify an unknown mainboard, fret not - there are several workable alternatives to throwing darts at a list of mobo makers.
In this article, I will concentrate on the American Megatrends and Award BIOS'es, as they are by far the ones most commonly used by modern desktop systems. I will address three basic methods for use in determining your mainboard manufacturer.
The "Look At It" Method
The first thing to do, and probably the last thing that many folks think of, is to simply "look at it". Many mobo makers will screen-print their ID right on the board. Ideally this ID will be on the upper (visible) surface of the board, but this is often not the case with "generic" mobo's. With some of these boards, if they are ID'ed at all, it is on the lower surface, which is normally not visible on an installed board.
Look carefully at the entire surface of the board, including those areas that may be hidden behind drives, cables, or the power supply. Many boards are labeled between their expansion slots. Another common location on newer boards is in the area of the CPU slot or socket. Also, be aware that while the board may not have its maker's name showing, it just may have its model name or number printed there for all the world to see.
While you are searching the board for make and model info, take a minute to note the location of any jumpers or DIP switches on the board. If you are doing an upgrade requiring resetting any of these devices, it will help to know where they are located. Figures 1A through 1E illustrate the mainboard identification schemes used on four different mainboards
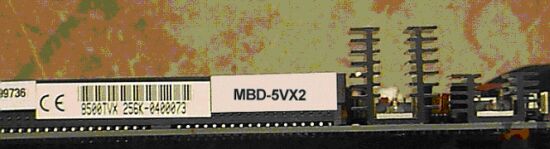
Figure 1A - Two model numbers on same board, on side of ISA slot
In Figure 1A, we can see the markings applied to a generic model. The markings here are somewhat unusual in that it would appear that there are two different model numbers identified - 8500TVX and MBD-5VX2. This is sometimes the case when a basic board from one manufacturer is sold under another brand name. There are several mainboards on the market, under widely varying names, all made by one company. This situation is a real problem when the manufacturing company is just that - an operation that builds and sells generic boards for other (marketing) firms without providing any real end-user support. The support responsibilities fall on the seller, and often there is little or no support to be had as a result. A web search for these models via www.google.com returned enough hits on the 8500-TVX to make it obvious that the board is a Biostar board. A similar search for the MBD-5VX2 designation returned no hits. A quick hop to Biostar's website www.biostar-usa.com and a little bit of detective-type browsing through their museum showed the board to be a model MB8500TVX-A version 1 board. For the record, this board is also screened with that information on its surface, as shown in Figure 1B below.

Figure 1B - MB8500TVX-A surface marking
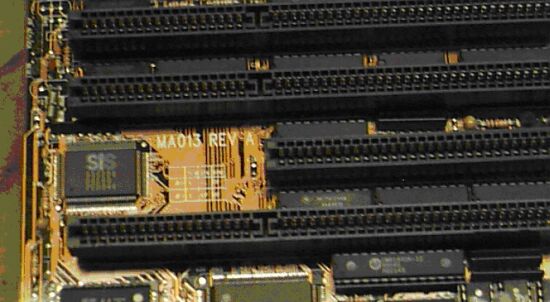
Figure 1C - Board ID between ISA slots
In Figure 1C, we can see the markings on an older 386 mainboard. Here, the model number and revision level are clearly evident, but the manufacturer is again not shown. Get used to that. As a general rule, the top name-brand boards will usually headline their brand name, but the lesser-known boards are going require some digging. This particular board can be identified as a product of Edom International, but not with a simple web search. Once identified via an advanced search, using MA013 and 386DX as the search strings, it becomes evident that the board was an Edom product.
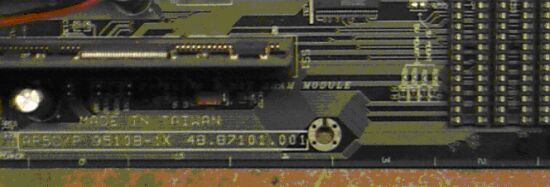
Figure 1D - Board ID on edge of board, near cache slot
In Figure 1D, we see another model number, AP5C/P. This time, a simple web search on that string returned numerous (102) hits. Among the top ten hits, six were for pages on Acer or AOpen sites. A couple of clicks later and we're at http://english.aopen.com.tw, the English-language home page for this manufacturer. Pretty sweet, huh? Let's take a look at the last picture, Figure 1E.
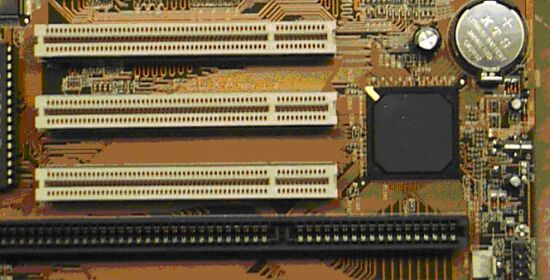
Figure 1E - Board ID between PCI slots
Here again we can see a model number and revision level only. First step, which by now should pretty apparent, is a web search. In this case, the web search leads us to www.dcscomputer.com.tw, the home page for the board maker DCS Computer Systems.
So what does all of this mean - why did I go through all of this if it is so obvious? Well ... because it is only obvious once you've done it a time or two. Sometimes the most obvious alternative gets overlooked simply because we think that it can't be that easy! Moral of this story - start out with what you can see - "Lookatit".
The BIOS Method
Under normal conditions each and every mainboard model or model family uses a unique BIOS. This is a geeky way of saying that the BIOS used on most mainboards was written or modified specifically for that board type. It is for this reason that you will notice so many different BIOS update files on most manufacturers' websites. If a company produces fifteen different mainboard families, there will generally be at least fifteen different BIOS versions used across that mix. Sometimes, different BIOS versions will be used within a mainboard family as well. Consider two boards within a given design family, one with two DIMM slots and supporting up to 512MB of SDRAM, while the other has three DIMM slots and supports 768 MB of SDRAM. A likely consequence of this design change is that these two boards, while in the same design family, will probably use different BIOS versions.
Don't be confused by the terminology here, either. The terms version and release have two distinct meanings as applied to PC mainboard BIOS. Version is generally taken to mean a BIOS that is designed for a specific combination of processor, RAM, chipset, peripheral support, OS support, and performance level. Release is generally taken to mean a specific iteration of a specific BIOS version. Various BIOS versions are offered in various releases as bug fixes or additional system enhancements become available. Some websites will refer to their BIOS update offerings by mainboard model and BIOS version. In this case, the mainboard model correlates to the actual BIOS version, while the update version correlates to the BIOS version release.
Now that that is out of the way, why is it important to begin with? It's like
this - if each different mobo uses a unique BIOS, it stands to reason that the
mobo can then be identified simply by identifying the BIOS that it uses. Some
manufacturers make this very easy for us by displaying the BIOS version and
release on system startup. Others will display a BIOS identifier string on
startup, while still others will offer no on-screen clues. Lets consider an easy
one first.
 |
| Figure 2 - Mainboard ID information displayed on startup |
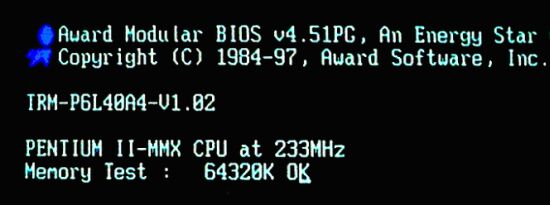
Figure 2 shows the information displayed at the upper left corner of the monitor on system startup, during the RAM count. Figure 3 shows the BIOS ID string (for the same mainboard) that is displayed at the same time. To keep this information displayed long enough to write it down, simply press the Pause key on your keyboard when the information appears. Write down the desired information, and then press any key to continue the boot cycle.
In Figure 2, the board is identified with the string TRM-P6L40A4-V1.02, and the BIOS used is some iteration of Award's 4.51PG BIOS - probably the most popular PNP BIOS in use today. Using the board ID string as a basis, a simple web search takes us to http://support.tekramusa.com, the support site provided by the board maker, Tekram Technology.
The board ID string also tells us that the current BIOS release is v1.02. Is this information relevant? The answer to that depends upon the reason you are trying to ID the board in the first place. Suppose you are having a problem getting a real-mode CD-ROM device driver (for your BTC CD-ROM reader) to load successfully. Somewhere along the line, somebody says, "Yeah - that was a problem with that mobo with early BIOS releases. They fixed that in release 1.03." Now it's obvious, right?
That's all the information that we need to identify this particular board. It actually identified itself and its BIOS release for us. Now suppose that we are dealing with a board that doesn't display the board ID info, but does display the BIOS ID string across the lower portion of the monitor, as shown in Figure 3 below. Can we use this information to work backwards to the board model? Sometimes ... as we are about to see.
 |
| Figure 3 - BIOS ID string displayed on startup |
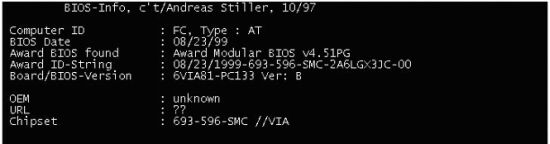
A quick look at the BIOS ID string gives us some helpful info right off the top. We can see that the BIOS date here is 10/29/97, and that the BIOS provides support for the Intel 440LX/Winbond W877AF chipset. The BIOS string also gives us some other useful info if you know where to look for it. I have found Wim's BIOS Site - http://www.wimsbios.com - to be an excellent resource for identifying the board from its BIOS ID string. This site has extensive listings for both AMI (American Megatrends) and Award BIOS'es, and there is also a wealth of other BIOS-related information available there as well.
As is thoroughly explained at Wim's BIOS Site, the significant portion of the string is the 2A69JTG9C portion, which includes a basic chipset code, a manufacturer code, and a model/family code. The following illustrations show how these codes relate in the tables provided at the site. As is evident in Figure 5, where available, there are also links provided to the board maker's website.
 |
| Figure 4 - BIOS chipset code in ID string 2A69JTG9C |
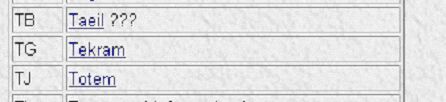 |
| Figure 5 - Manufacturer codes as referenced in ID strings |
 |
| Figure 6 - Manufacturer and board family or model codes in ID string 2A69JTG9C |
A similar scheme of ID codes is used by AMI in their BIOS'es. I have a 533MHz test box in my shop that reports a BIOS ID string of 62-0922-009999-00101111-071595-000000-M756LMR-H and a displayed date of 09/22/2000. In most cases, the last four digits in the third group are the manufacturer code. Note that I said "in most cases". This particular board is a PC-Chips board, and their assigned ID is 1437. There is no apparent pattern to the use of 9999 in the ID string, and I have seen it on several different makers' boards. This ID string does, however, include the board model, M756LMR, in its last group of digits. AMI calls this a Project Tag. Again there is no fixed rule to this. Some mobo's display their chipset type as the sixth group of digits, where this string shows all zeroes. What I have seen is that when the manufacturer ID is shown as 9999, the ID string will often contain the model as a project tag, and when the ID string has a valid maker ID, it then usually has a chipset type rather than a model displayed. In the case of this mobo, a web search for the Project Tag data yielded the manufacturer's name.
Identification of Motherboards By Software
The Software Method
Sometimes, there is no help to be found either on the board or in the startup display. If that is your situation, don't despair yet! We still have one more trick to try - we can "ask" the mainboard who it is, and who made it.
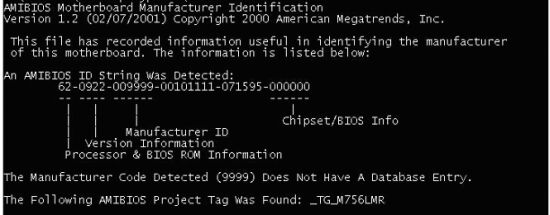
AMI offers a freeware mainboard (BIOS) identification utility that, although written specifically for the AMI BIOS'es, is only able to extract a very limited range of information. This utility is available for download at AMI's Bios support site. The following page, http://www.ami.com/support/bios.html, offers AMI's manufacturer code list as well as links for the ID utility and post- and beep-code references. The ID utility (AMIMBID.EXE) is a compact (94Kb) file that must be run from a pure DOS session. It will read the data stored on the BIOS chip and display the relevant portion of that data on-screen. It will also write a text file (RESULTS.TXT) that contains most of the information displayed. Figure 7 below illustrates the data written to the text file for the mainboard discussed in the previous section. Note that the BIOS ID string extracted is not quite the same as what was displayed on system startup. The boot display included the Project Tag, which is shown separately in the text file. Note also that this utility does not provide a manufacturer's name if the Manufacturer Code does not match a database entry. As was the case in earlier examples, a web search is in order for final determination of the board maker.
Needless to say, these results below are less than ideal, and not helpful at all if the board uses Award BIOS. In that case, I suggest the use of CTBIOS, another mobo ID utility. This one is the (freeware) product of c't, the leading PC enthusiast's magazine in Germany, and can be found at their website, http://www.heise.de/ct/english/. Of course, most of the site's pages are in German, so I'll give another link for this utility, http://bootdisk.com/. This site is chock-full of useful tools besides CTBIOS, so check it out carefully.
 |
| Figure 7 - AMIMBID results as written to disk |
This utility above will extract useful data from both AMI and Award BIOS'es, and it does a fairly good job of providing the board maker's name and web address. Compare Figures 8 and 9 below. Figure 8 show the output of CTBIOS v1.3, while Figure 9 shows the same system when examined by CTBIOS v1.5. In either case, it is evident that the board does not carry its maker's name in its BIOS chip. CTBIOS v1.5 reveals much more information than its earlier version did, but it cannot find something that is not there. Once again, we resort to the web search for the board model 6VIA81 or to Wim's BIOS Site for a lookup on the manufacturer ID X3. Wim identifies the X3 code as belonging to A-Corp, and this finding is easily verified by the web search.
 |
| Figure 8 - CTBIOS v1.3 results as displayed |
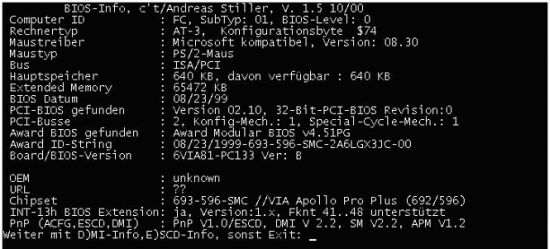 |
| Figure 9 - CTBIOS v1.5 results as displayed for same system as shown in Figure 8 |
In Conclusion
With all of the high-level system diagnostic utilities I have at my disposal, I still end up returning to these tried-and-true routines when I need to know whose product is in the machine. The utilities that I have recommended here are all freeware, readily available for download, and are easily run by executing their filenames at a command prompt. They will all return the desired information as on-screen displays. These factors combine to make them my utilities of choice for mainboard identification.
One of the obvious questions that may have occurred to you by now is "Why not skip all of this and go right to the BIOS producer's site for information?" Well, the short and sweet answer is that both AMI and Award will simply direct you to go to the mainboard maker for any BIOS support issues. Remember, the whole intent of this exercise was to identify the board maker. If we don't know who the board maker is well, you get the idea.
Click Here To Return To Link Page.